Zero-Touch Windows Deployment Without WDS
A journey through PXE boot, VirtIO drivers, SMB quirks, and the joy of watching Windows install itself at 3 AM.
 iPXE loading on a KVM virtual machine via Unraid
The Problem We Solved
Enterprise IT uses WDS (Windows Deployment Services) or SCCM for OS deployments. But these come with baggage:
- 🏢 WDS requires a Windows Server — licensing, maintenance, another VM to babysit
- 💰 SCCM is expensive — and complex enough to need its own admin
- 🏠 Overkill for homelabs — you just want to spin up VMs, not manage infrastructure
Our goal: Deploy Windows Server 2025 on KVM/QEMU VMs with zero human interaction. Click a button → wait 10 minutes → RDP into a fresh server.
Spoiler: We did it. Here’s how.
Architecture Overview
 Multi-VLAN deployment with Tentacle relay services
The secret sauce? Tentacles — lightweight relay services that handle PXE in each network segment. No VLAN trunk magic, no broadcast flooding, just one tentacle per network.
┌─────────────────────────────────────────────────────────────────────────┐
│                     PXE BOOT INFRASTRUCTURE                             │
├─────────────────────────────────────────────────────────────────────────┤
│                                                                         │
│                        ┌─────────────────────┐                          │
│                        │   Octofleet API     │                          │
│                        │   (Control Plane)   │                          │
│                        └──────────┬──────────┘                          │
│                                   │                                     │
│         ┌─────────────────────────┼─────────────────────────┐          │
│         │                         │                         │          │
│         ▼                         ▼                         ▼          │
│  ┌─────────────┐          ┌─────────────┐          ┌─────────────┐    │
│  │ 🐙 Tentacle │          │ 🐙 Tentacle │          │ 🐙 Tentacle │    │
│  │ Production  │          │     DMZ     │          │  Database   │    │
│  │ VLAN 100    │          │  VLAN 200   │          │  VLAN 300   │    │
│  ├─────────────┤          ├─────────────┤          ├─────────────┤    │
│  │ • ProxyDHCP │          │ • ProxyDHCP │          │ • ProxyDHCP │    │
│  │ • TFTP      │          │ • TFTP      │          │ • TFTP      │    │
│  │ • Samba     │          │ • Samba     │          │ • Samba     │    │
│  └──────┬──────┘          └──────┬──────┘          └──────┬──────┘    │
│         │                        │                        │            │
│    ┌────┴────┐              ┌────┴────┐              ┌────┴────┐      │
│    │ 🖥️ 🖥️ 🖥️ │              │   🖥️    │              │         │      │
│    │ VMs     │              │   VM    │              │ (idle)  │      │
│    └─────────┘              └─────────┘              └─────────┘      │
│                                                                         │
└─────────────────────────────────────────────────────────────────────────┘
The Boot Sequence
When a VM powers on with PXE boot enabled, magic happens:
┌──────────────────────────────────────────────────────────────────────────┐
│                         BOOT TIMELINE                                    │
├──────────────────────────────────────────────────────────────────────────┤
│                                                                          │
│  ●━━━━━●━━━━━●━━━━━●━━━━━●━━━━━●━━━━━●━━━━━●━━━━━●━━━━━●                │
│  │     │     │     │     │     │     │     │     │     │                │
│  PXE   DHCP  iPXE  HTTP  WinPE SMB   Disk  DISM  Boot  Agent            │
│  ROM   Offer Load  Chain Load  Mount Part  Apply loader Online          │
│                                                                          │
│  0s    1s    3s    5s    30s   60s   90s   5min  8min  10min            │
│                                                                          │
└──────────────────────────────────────────────────────────────────────────┘
Step 1: ProxyDHCP (dnsmasq)
The VM’s BIOS/UEFI sends a DHCP request. Our existing DHCP server provides an IP, but dnsmasq jumps in with extra information:
# /etc/dnsmasq.conf
port=0                          # No DNS (we have another server)
dhcp-range=192.168.0.0,proxy    # ProxyDHCP mode - augment, don't replace
dhcp-boot=tag:efi64,ipxe.efi    # "Hey, boot this file!"
pxe-service=tag:efi64,x86-64_EFI,"iPXE",ipxe.efi
enable-tftp
tftp-root=/tftpboot
ProxyDHCP is the unsung hero. It coexists with your production DHCP server, adding PXE boot instructions without touching IP allocation.
Step 2: iPXE Chain Loading
The BIOS loads ipxe.efi via TFTP, which then fetches a script via HTTP:
#!ipxe
# boot.ipxe - Main entry point

echo ╔═══════════════════════════════════════════════════════════╗
echo ║          🐙 OCTOFLEET ZERO-TOUCH DEPLOYMENT 🐙           ║
echo ╚═══════════════════════════════════════════════════════════╝

# Try MAC-specific script first
chain --autofree http://192.168.0.5:9080/boot/${mac:hexhyp}.ipxe || goto menu

:menu
# Fallback to interactive menu or local boot
echo No deployment job for this MAC address.
exit
The ${mac:hexhyp} variable expands to the MAC address with hyphens (e.g., 52-54-00-65-d5-42), allowing per-machine customization.
Step 3: MAC-Specific Scripts
Each machine gets its own boot script:
# /boot/52-54-00-65-d5-42.ipxe
#!ipxe
kernel http://192.168.0.5:9080/images/winpe/wimboot
initrd http://192.168.0.5:9080/images/winpe/boot.wim
boot
This loads WinPE (Windows Preinstallation Environment) — a minimal Windows that runs entirely in RAM.
The Challenges (And How We Beat Them)
🔴 Challenge 1: VirtIO Disk Not Detected
Symptom: WinPE boots, but diskpart shows no disks.
Root Cause: KVM uses VirtIO for disk I/O, but WinPE doesn’t include VirtIO drivers.
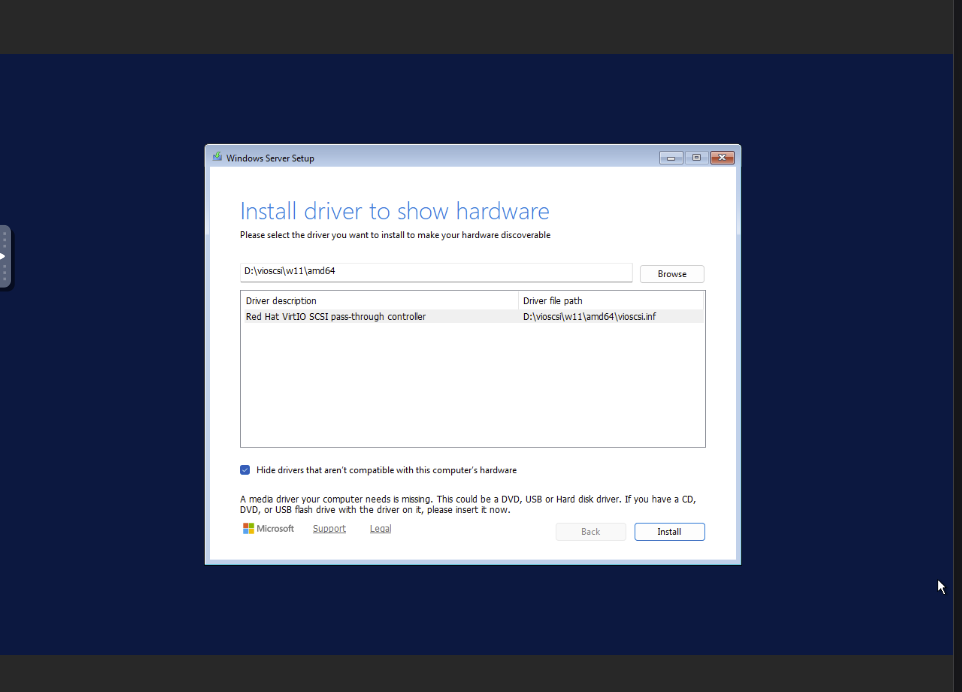 Loading the Red Hat VirtIO SCSI driver in Windows Setup
Solution: Embed drivers in boot.wim:
# On Linux with wimtools
mkdir /tmp/winpe
wimmountrw boot.wim 1 /tmp/winpe

# Copy VirtIO SCSI driver (NOT viostor!)
cp /mnt/virtio/amd64/2k25/vioscsi.* /tmp/winpe/Windows/System32/drivers/
cp /mnt/virtio/amd64/2k25/netkvm.* /tmp/winpe/Windows/System32/drivers/

wimunmount --commit /tmp/winpe
🚨 Critical: Use
vioscsi.inffor SCSI disks, notviostor.inf. This cost us 2 hours of debugging.
In startnet.cmd:
drvload X:\Windows\System32\drivers\vioscsi.inf
drvload X:\Windows\System32\drivers\netkvm.inf
🔴 Challenge 2: SMB Share Unreachable
Symptom: net use Z: \\192.168.0.5\images returns “System error 53” or “67”.
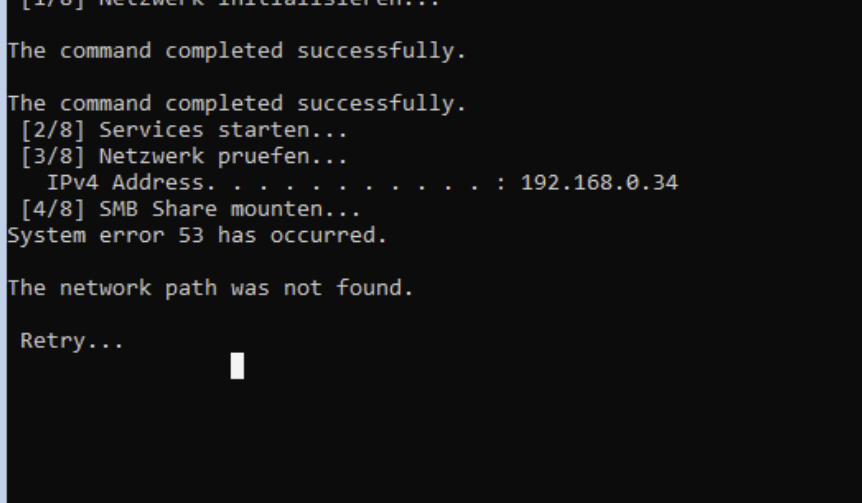 The dreaded “network path was not found” error in WinPE
Root Cause: WinPE’s SMB client service isn’t started by default.
Solution:
net start lanmanserver
ping -n 5 127.0.0.1 >nul  :: Wait 5 seconds
net use Z: \\192.168.0.5\images
But wait — it still fails! Sometimes it works on the first try, sometimes after 30 seconds, sometimes after 5 minutes. What gives?
🔴 Challenge 3: The 3-5 Minute SMB Mystery
This one drove us crazy. The network was up, ping worked, but SMB connections took forever.
Root Cause: Samba was doing reverse DNS lookups on connecting clients. In our network without proper PTR records, each lookup timed out after ~90 seconds.
Solution: Configure Samba for speed:
# /etc/samba/smb.conf
[global]
   server min protocol = NT1    # WinPE needs SMB1
   ntlm auth = yes              # Allow NTLM authentication

   # THE FIX - disable DNS lookups
   name resolve order = bcast host
   dns proxy = no
   hostname lookups = no

[images]
   path = /srv/images
   guest ok = yes
   read only = yes
After this change: instant connections. 🎉
🔴 Challenge 4: Reliable Automation
Real networks are messy. Sometimes SMB takes 5 seconds, sometimes 50. Our final startnet.cmd uses retry loops:
@echo off
echo ═══════════════════════════════════════════════════════════
echo       OCTOFLEET ZERO-TOUCH DEPLOYMENT
echo ═══════════════════════════════════════════════════════════

:: Load VirtIO drivers
drvload X:\Windows\System32\drivers\vioscsi.inf
drvload X:\Windows\System32\drivers\netkvm.inf

:: Initialize network
wpeinit
wpeutil initializenetwork

:: Wait for DHCP
:wait_ip
ping -n 2 127.0.0.1 >nul
ipconfig | find "192.168" >nul
if errorlevel 1 goto wait_ip

:: Start SMB client
net start lanmanserver

:: Mount share with retry
:smb_retry
net use Z: \\192.168.0.5\images 2>nul
if not errorlevel 1 goto smb_ok
echo Waiting for SMB...
ping -n 10 127.0.0.1 >nul
goto smb_retry
:smb_ok

:: Partition disk
diskpart /s X:\diskpart.txt

:: Apply Windows image
dism /apply-image /imagefile:Z:\install.wim /index:4 /applydir:W:\

:: Configure bootloader
bcdboot W:\Windows /s S: /f UEFI

:: Reboot into Windows
wpeutil reboot
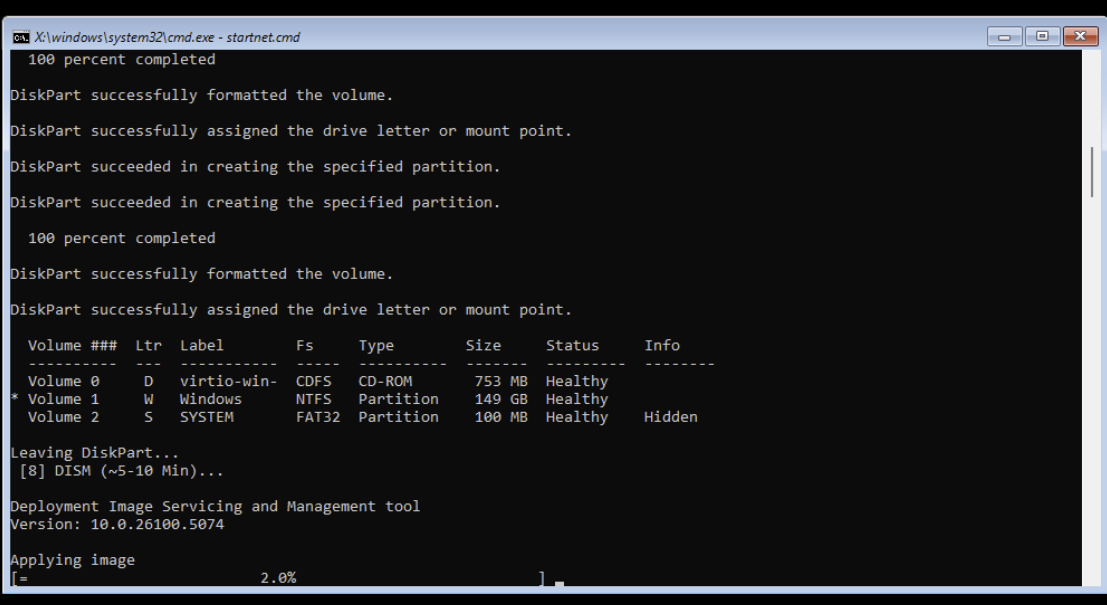 DISM applying the Windows image — the home stretch!
The UI: Making It User-Friendly
Automation is great, but visibility is better. We built a provisioning dashboard:
 The Octofleet Provisioning Queue — real-time deployment tracking
Provisioning Queue
Track all active deployments with real-time progress:
- Visual progress — see exactly where each deployment is
- Status badges — waiting, booting, applying, completed, failed
- Timeline view — click to see detailed logs
- Quick actions — retry failed jobs, cancel pending ones
Unknown MAC Detection
When a device PXE boots without a job, we catch it:
🔔 NEW DEVICE DETECTED

A new device is PXE booting but has no provisioning job:

MAC Address:    52:54:00:99:88:77
Detected at:    21:52:03 UTC
Tentacle:       pxe-main (192.168.0.5)
Boot attempts:  3

[🖥️ Create Job]  [🚫 Ignore]  [🔇 Block MAC]
One click → new provisioning job → that machine installs itself.
Multi-VLAN with Tentacles
Real networks have VLANs. PXE broadcasts don’t cross VLAN boundaries (unless you configure IP helpers, which is fragile).
Our solution: Tentacles — small Docker containers that run in each network segment.
# docker-compose.yml
services:
  pxe:
    image: octofleet/tentacle:latest
    network_mode: host
    cap_add:
      - NET_ADMIN
    volumes:
      - ./images:/srv/images:ro
      - ./tftpboot:/tftpboot:ro
    environment:
      - OCTOFLEET_API=https://octofleet.example.com/api
      - TENTACLE_NAME=production
      - VLAN=100
Each tentacle:
- ✅ Handles PXE for its local segment
- ✅ Caches images locally (no cross-VLAN traffic during deployment)
- ✅ Reports status to the central API
- ✅ Can work independently if the API is unreachable
Results & Performance
| Metric | Value |
|---|---|
| Time to first RDP | ~10 minutes |
| Network transfer | ~7 GB (Windows image) |
| Human interaction | Zero (after job creation) |
| Success rate | 98%+ (failures are usually network issues) |
What we eliminated:
- ❌ WDS server maintenance
- ❌ Manual ISO mounting
- ❌ Clicking through installers
- ❌ Post-install configuration
What we gained:
- ✅ Repeatable deployments
- ✅ Self-documenting infrastructure (jobs have logs)
- ✅ Scale without effort (one tentacle per VLAN)
Key Takeaways
- ProxyDHCP is your friend — coexist with existing DHCP, don’t fight it
- VirtIO drivers matter —
vioscsifor SCSI,viostorfor IDE (know your storage) - SMB in WinPE is weird —
net start lanmanserver+ retry loops - Samba DNS lookups kill performance —
name resolve order = bcast host - Automation needs retry loops — networks are unreliable, embrace it
What’s Next
- Autounattend.xml integration — skip OOBE, set passwords, join domains
- Agent auto-enrollment — newly deployed servers register themselves
- Linux support — cloud-init for Ubuntu/Rocky Linux deployments
- Bare metal — same workflow for physical servers
Code & Resources
Everything is open source:
- Octofleet — github.com/BenediktSchackenberg/octofleet
- VirtIO Drivers — github.com/virtio-win/virtio-win-pkg-scripts
- iPXE — ipxe.org
- wimtools — Linux WIM manipulation (
apt install wimtools)
Questions? Found a bug? Open an issue or find me on GitHub.